3.5.3. Configuring Boot Over Fabric
3.5.3.1. Setting Up PXE Boot
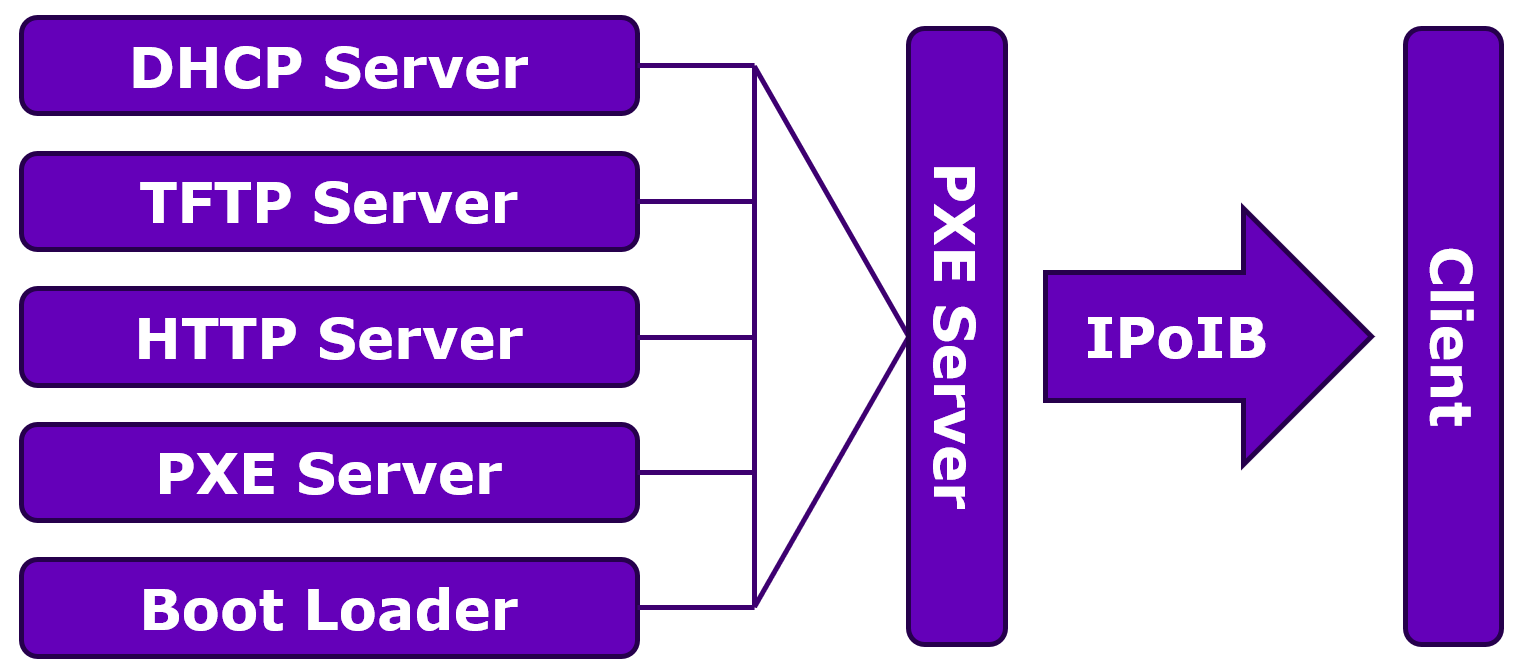
Boot Over Fabric requires at least two nodes connected to a Switch. One node is the Client node, where the OS will be installed. The other node is a PXE Server. The Client and Server nodes communicate using IPoIB.
The communication between the Client node and the PXE Server proceeds as follows:
Client requests to DHCP Server and receives the IP address of TFTP Server and boot image (the name of bootloader).
Client contacts the TFTP Server and receives the boot image.
Client executes the boot image and downloads all other needed files, such as kernel and initial root file system
initrd.imgfrom the PXE Server and loads them.Note
The
initrd.imgmay not contain all the modules required to use IPoIB with hfi1; therefore, updates are required before booting over the SuperNIC.The installation of the target OS starts on the Client machine using the ISO image of the target OS downloaded from the HTTP Server.
The following figure shows a high-level overview of the communication between the Client and Server.
3.5.3.1.1. Configure the DHCP Server
The Dynamic Host Configuration Protocol (DHCP) server assigns network information to the client, including the IP address and the location of the boot files.
Install the DHCP server:
dnf install dhcp-server
Create the configuration file:
vi /etc/dhcp/dhcpd.conf
Within this file, you define the settings for PXE clients. This includes option
pxelinuxand specific codes for boot files. The configuration also needs to define the network subnet, IP range, router, and broadcast addresses.For clients identified as PXEClient, the server will specify the next server to contact, which is the TFTP server. The configuration also determines which boot file to use based on the client's architecture:
For UEFI systems, the filename is
uefi/grubx64.efi.For other systems, it is
pxelinux/pxelinux.0.
The following configuration sets up the 192.168.100.0 network portion:
# DHCP Server Configuration file.
#
option space pxelinux;
option pxelinux.magic code 208 = string;
option pxelinux.configfile code 209 = text;
option pxelinux.pathprefix code 210 = text;
option pxelinux.reboottime code 211 = unsigned integer 32;
option architecture-type code 93 = unsigned integer 16;
allow booting;
allow bootp;
subnet 192.168.100.0 netmask 255.255.255.0 {
    range 192.168.100.2 192.168.100.230;
    option subnet-mask 255.255.255.0;
    option broadcast-address 192.168.100.255;
    option routers 192.168.100.1;
        class "pxeclients" {
            match if substring (option vendor-class-identifier, 0, 9) = "PXEClient";
            next-server 192.168.100.1;
            if option architecture-type = 00:07 {
                filename "uefi/grubx64.efi";
            } else {
                filename "pxelinux/pxelinux.0";
            }
       }
}
Start and enable the service:
systemctl enable dhcpd.service
Verify the DHCP server is running:
systemctl status dhcpd.service
3.5.3.1.2. Configure the HTTP Server
The HTTP server hosts the installation images that the client will download.
Install the HTTP server:
dnf install httpd
Create a configuration file:
vi /etc/httpd/conf.d/netinstall.conf
The configuration file reads as follows:
Alias /netinstall /var/www/html/netinstall
<Directory /var/www/html/netinstall>
Options Indexes FollowSymLinks
Order Deny,Allow
Allow from all
</Directory>
This file creates an alias for
/netinstallthat points to the/var/www/html/netinstalldirectory.Create a new directory for the ISO image:
mkdir -p /var/www/html/netinstall
Edit
/etc/httpd/conf/httpd.confand comment outlisten 80. Update theListenfield to bind to the IPoIB address:Listen 192.168.100.1:80 # Listen 80
Start and enable the server:
systemctl start httpd.service
systemctl enable httpd.service
Reload the server:
systemctl httpd reload
3.5.3.1.3. Configure the TFTP Server
The Trivial File Transfer Protocol (TFTP) server transfers boot files to the client.
Install the TFTP server:
dnf install tftp*
Create the socket file:
vi /etc/systemd/system/tftp.socket
This file sets up a listener on UDP port 69.
[Unit]
Description=TFTP Trivial File Transfer Protocol Socket
[Socket]
# TFTP listens on UDP port 69
ListenDatagram=69
[Install]
WantedBy=sockets.target
Create the service file:
vi /etc/systemd/system/tftp.service
This file specifies the executable TFTP server and its root directory:
[Unit]
Description=Tftp Server
Requires=tftp.socket

[Service]
# The user the server will run as
User=root

# The TFTP server executable and its arguments
ExecStart=/usr/sbin/in.tftpd -c -p -s /var/lib/tftpboot
StandardInput=socket
StandardError=journal

[Install]
WantedBy=multi-user.target
Also=tftp.socket
Start the service:
systemctl daemon-reload
systemctl enable tftp.service
systemctl start tftp.service
3.5.3.1.4. Prepare the Image for the Client
Prepare the installation image. The following example uses an ISO image for RHEL 9.5. The user should have their own ISO image.
Note
The target OS/version image being built must be built by a machine of the same OS/version.
Decompress and mount the ISO:
mount -o loop RHEL-9.5.0-20241009.2-x86_64-dvd1.iso /media/
Create a new directory for the
initrd.img:mkdir -p /home/images/initrd
Copy the
initrd.imgfile:cp /media/images/pxeboot/initrd.img /home/images/initrd/
Extract the contents of the
initrd.img:cd /home/images/initrd xz -dc < initrd.img | cpio -idmv
Remove the
initrd.imgfile:rm -rf initrd.img
Remove the
inbox hfi1.ko.xzandrdmavt.ko.xzdrivers:rm -f /home/images/initrd/lib/modules/5.14.0-503.11.1.el9_5.x86_64/kernel/drivers/infiniband/hw/hfi1/hfi1.ko.xz rm -f /home/images/initrd/lib/modules/5.14.0-503.11.1.el9_5.x86_64/kernel/drivers/infiniband/sw/rdmavt/rdmavt.ko.xz
Copy the
hfi1.koandrdmavt.kofiles to theinitrd.img.cp /lib/modules/5.14.0-503.11.1.el9_5.x86_64/extra/opxs-kernel-updates/hfi1.ko /home/images/initrd/lib/modules/5.14.0-503.11.1.el9_5.x86_64/kernel/drivers/infiniband/hw/hfi1/ cp /lib/modules/5.14.0-503.11.1.el9_5.x86_64/extra/opxs-kernel-updates/rdmavt.ko /home/images/initrd/lib/modules/5.14.0-503.11.1.el9_5.x86_64/kernel/drivers/infiniband/sw/rdmavt/
Compress the drivers:
xz /home/images/initrd/lib/modules/5.14.0-503.11.1.el9_5.x86_64/kernel/drivers/infiniband/hw/hfi1/hfi1.ko

xz /home/images/initrd/lib/modules/5.14.0-503.11.1.el9_5.x86_64/kernel/drivers/infiniband/sw/rdmavt/rdmavt.ko
Add the
ib_ipoibmodule to ensure the InfiniBand network interface is loaded at boot:touch /home/images/initrd/lib/modules-load.d/ib_ipoib.conf echo "# Load ib_ipoib.ko at boot" >> /home/images/initrd/lib/modules-load.d/ib_ipoib.conf echo "ib_ipoib" >> /home/images/initrd/lib/modules-load.d/ib_ipoib.conf
Generate the new
initrd.img:cd /home/images/initrd find . | cpio -o -c -R root:root |gzip -9 > ../initrd_CN5K.img
Create a new directory within
tftpboot:mkdir -p /var/lib/tftpboot/uefi
Copy the newly created
initrd.imgandvmlinuzto thetftpboot/uefidirectory.cp /home/images/initrd_CN5K.img /var/lib/tftpboot/uefi/ cp /media/images/pxeboot/vmlinuz /var/lib/tftpboot/uefi/
3.5.3.1.5. Configure the Boot Loader
Prepare the necessary boot files for the client. This is dependent on your ISO file.
Create a new directory to copy the mounted ISO to:
mkdir -p /var/www/html/netinstall/ISO/RHEL95/
Use the
rsynccommand to copy ISO to the newly created directory:rsync -av /media/ /var/www/html/netinstall/ISO/RHEL95/
Unmount the ISO:
umount /media
Set the proper permissions:
chmod -R 755 /var/www/html/netinstall/ISO/RHEL95
chown -R apache:apache /var/www/html/netinstall/ISO/RHEL95  # or nginx:nginx for nginx
Copy the boot image:
cd /var/www/html/netinstall/ISO/RHEL95/EFI/BOOT
cp grubx64.efi /var/lib/tftpboot/uefi/
Create the
Grub.cfgconfiguration file:vi /var/lib/tftpboot/uefi/grub.cfg
The file should read as follows:
set timeout=20
menuentry 'RHEL 9.5' {
        linuxefi uefi/vmlinuz net.ifnames=0 biosdevname=0 rd.neednet=1 rd.net.timeout.carrier=60
    rd.driver.pre=hfi1,ib_ipoib  ip=ib1:dhcp ip.bootdev=ib1 bootproto=dhcp
    inst.repo=http://192.168.100.1/netinstall/ISO/RHEL95 iommu=pt
        initrdefi uefi/initrd_CN5K.img
}
Reload the HTTP service:
systemctl restart httpd.service
Test the HTTP access to verify that the HTTP service is active and running:
Test from the PXE server:
curl -I
http://192.168.100.1/netinstall/ISO/RHEL95/.treeinfo
# Should return: HTTP/1.1 200 OK

curl -I http://192.168.100.1/netinstall/ISO/RHEL95/images/install.img
# Should return: HTTP/1.1 200 OK
Check the file size (
install.imgshould be ~600-900 MB):curl -sI http://192.168.100.1/netinstall/ISO/RHEL95/images/install.img | grep -i content-length # Content-Length: 932093952
Test the directory listing (optional but helpful for debugging):
curl -I http://192.168.100.1/netinstall/ISO/RHEL95/
# Should return: HTTP/1.1 200 OK
3.5.3.1.6. Client Connection Settings
For the client to boot, the network configuration must be set to an IP address provided by the DHCP server.
Use the configuration file
/etc/NetworkManager/system-connections/ibs785.nmconnectionto set the IPv4 method toauto:[connection] id=ibs785 uuid=2316e2ad-bc3d-4465-a307-c474c023a5bc type=infiniband #autoconnect=true interface-name=ibs785 [infiniband] transport-mode=datagram [ipv4] method=auto [ipv6] addr-gen-mode=eui64 method=auto [proxy]
Reboot the host.
On the PXE server, run
tail -f /var/log/messages, then reboot your client.Once booted, the DHCP server handout outputs an address to the client:
tail -f /var/log/messages for DHCPACK on 192.168.100.2 to 20:d0:06:6a:02:01:00:00:30 (cncc-gen-013) via ibp33s0d1