3.3.4. Bringing Up the System for the First Time
This section outlines the steps for bringing up the system for the first time.
Important
After powering on your hardware, verify your firmware versions. If you need to update the firmware, refer to the CN5000 Maintenance and Troubleshooting Guide:
3.3.4.1. SuperNIC Start-up Procedure
From the command prompt, verify the SuperNIC is installed by running lspci -vvv |grep Cornelis as shown in the following example.
# lspci -vvv |grep Cornelis
21:00.0 Fabric controller: Cornelis Networks CN5000 HFI Silicon, Dual Port, BGA [discrete]
        Subsystem: Cornelis Networks CN5000 HFI Adapter, Single Port, QSFP, x16 PCIe Gen 5, Air-Cooled
Note
If the output does not provide detailed information (as shown in the following example),
# lspci |grep Cornelis
21:00.0 Fabric controller: Cornelis Networks Device 0001 (rev ff)
then run the Linux command update-pciids to download the newer version of the PCI ID list and rerun lspci -vvv |grep Cornelis.
3.3.4.2. CN5000 Switch and DCS Start-up Procedures
The switch CLI can be accessed in two ways:
Through Ethernet using SSH
Note
DHCP is enabled by default.
Using the switch USB serial port
Note
You will need to purchase a USB-A (male to male) cable to connect to the serial port.
3.3.4.2.1. Procedures
When using the default DHCP, connect one end of an Ethernet cable to the RJ-45 connector of the Omni-Path switch and the other end to an OOB LAN workstation, another switch, or a hub.
For a CN5000 Switch, the Ethernet port is on the back of the switch (power supply side).
Figure 65. CN5000 Switch USB Serial and Ethernet Ports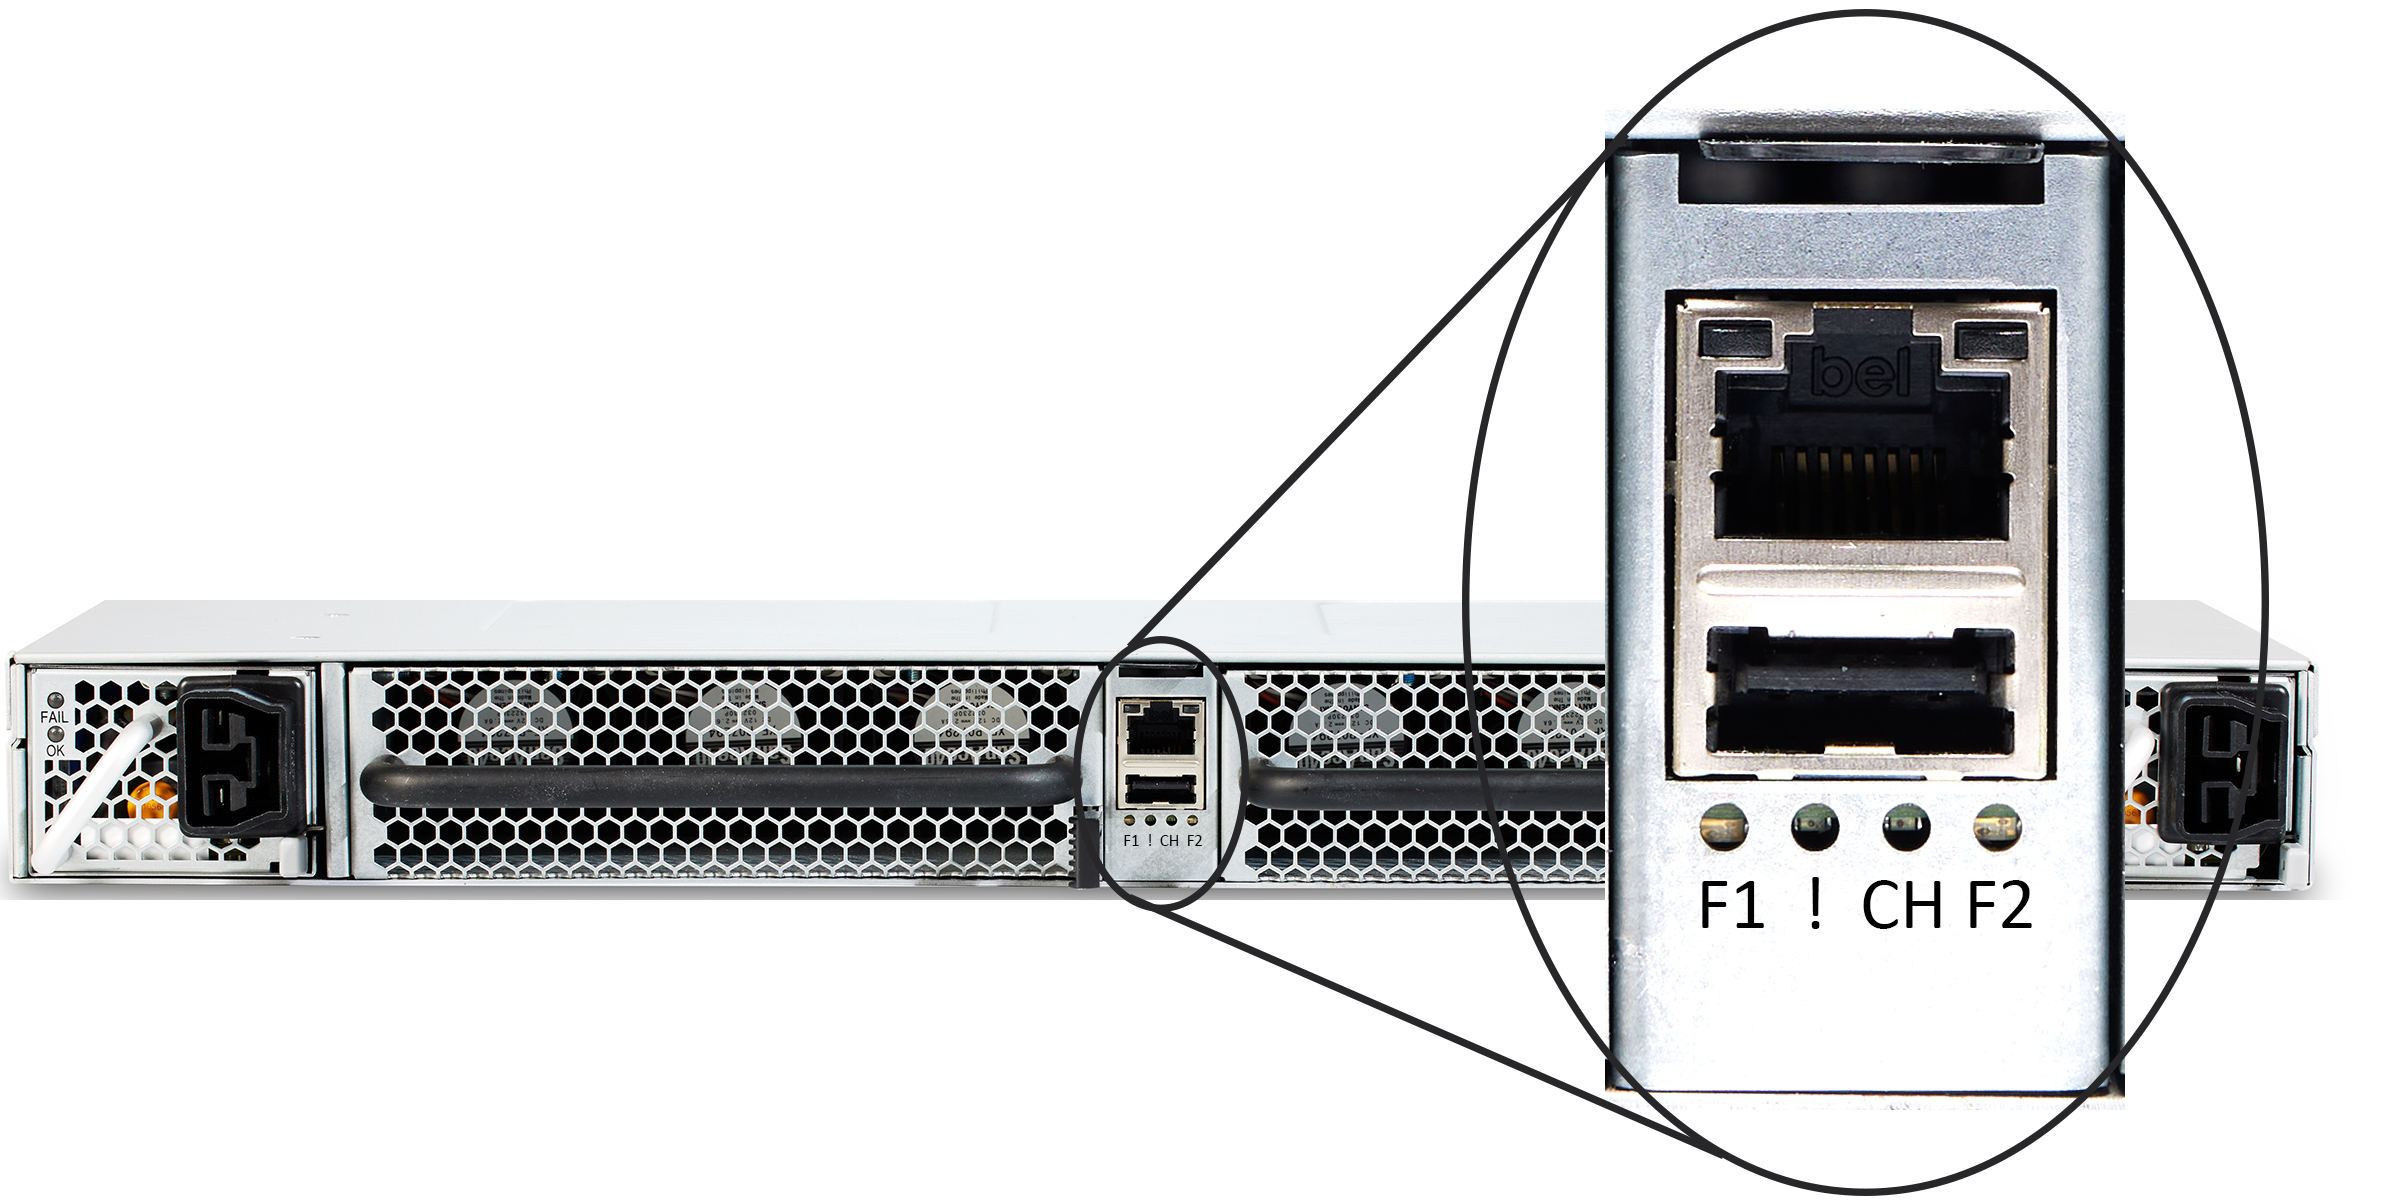
For a DCS, the Ethernet port is on the Management Module (bottom red circle in the following figure).
Figure 66. CN5000 DCS Management Module Ports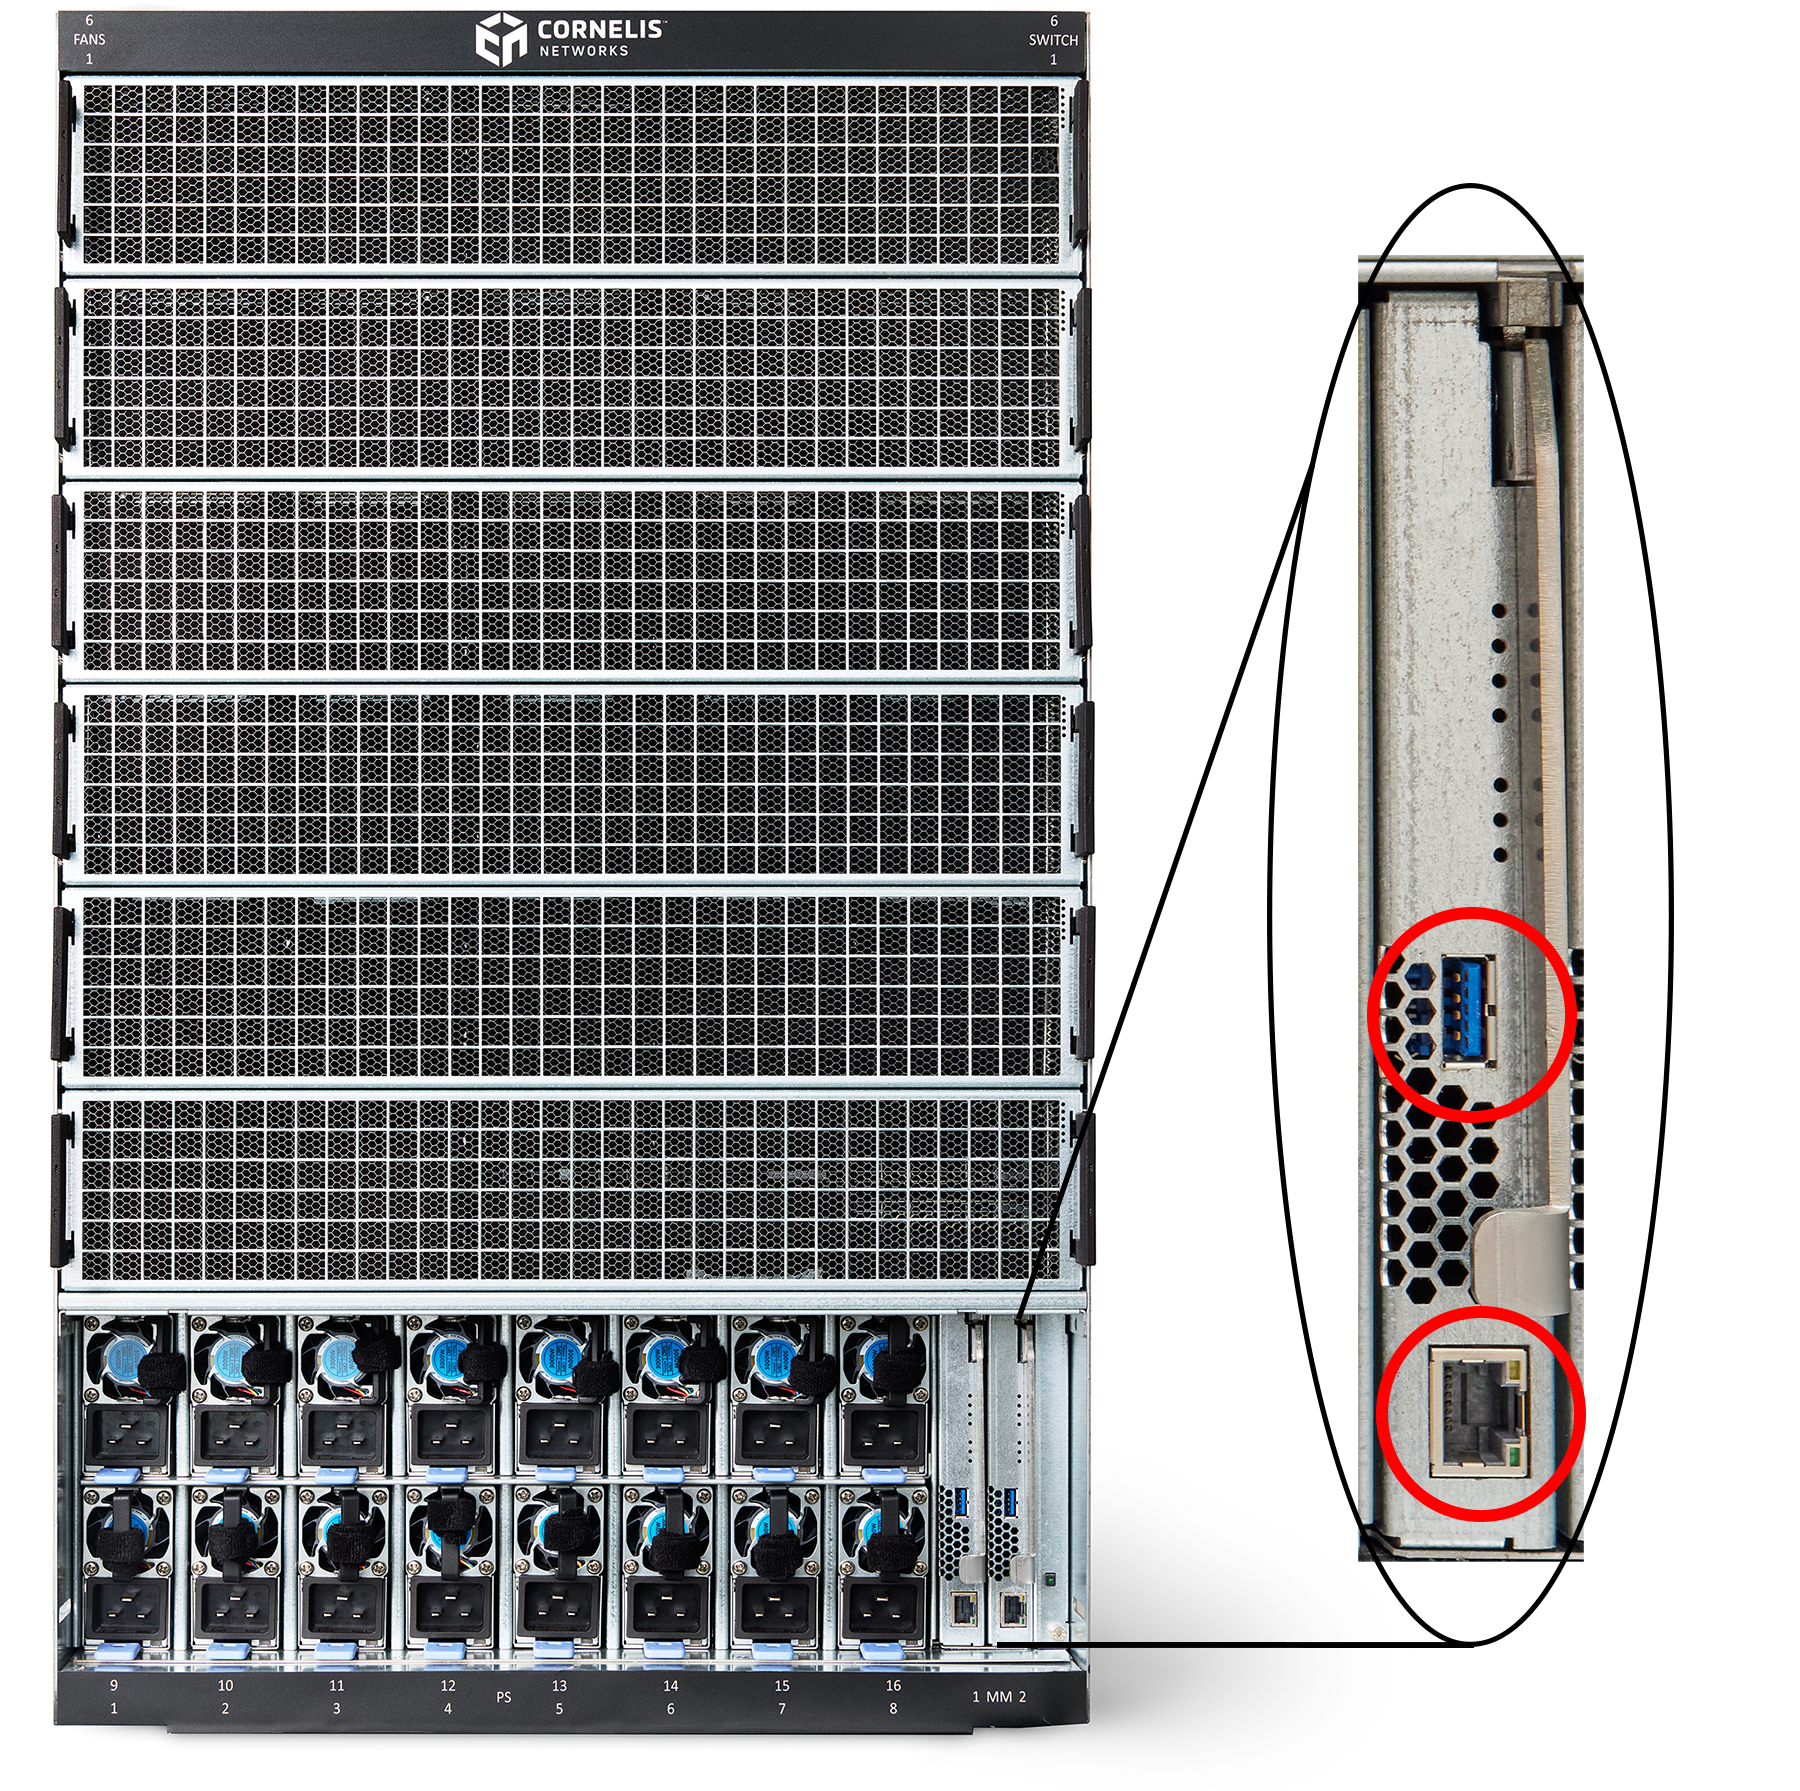
Note
If using static IP Addressing, connect a serial cable from the USB port (USB-A) on the switch to your laptop.
Power up the switch.
Note
During startup/boot of a liquid-cooled switch, you may see the following message:
[FAILED] Failed to start Fan Sensor.
Liquid-cooled switches do not have a Fan Sensor, therefore, you can ignore this message.
Log into the Omni-Path switch using ssh with the assigned IP address provided by the DHCP server.
At the login prompt, type in username (
admin) and password (admin123).Note
For enhanced security, change the password after logging in the first time.
Verify the IP address with the CLI command
network.The system returns information similar to the following example:
admin@CNEdge -> network
IP: <IP Address>    (Source: Dynamic)
Netmask: 255.255.255.0
DHCP:
    IPv4: enabled
    IPv6: enabled
Default Gateway:
    IPv4: <IP Address>
    IPv6: not set
Nameservers: None
SNMP: disenabled
IPoIB is currently disabled
IPv6 auto-configuration is currently enabled
Check the firmware version of the switch with the command
firmware version.admin@CNEdge -> firmware version Firmware Versions: Switch BMC: 12.0.0B0.5 ASIC A: 12_0_0B0_3 ASIC B: N/A
Compare the version to the latest available in the Cornelis Customer Center.
If a firmware version is not current, refer to the CN5000 Maintenance and Troubleshooting Guide, Update the SuperNIC Firmware or Update the Switch Firmware.
3.3.4.2.1. Changing from DHCP to Static IP Addresses
If you prefer to use Static IP Addressing instead of the default DHCP, perform the following steps.
Caution
Before disabling DHCP, you must have a USB-A (male to male) cable connected to the serial port.
Note
To set up your terminal connection using a program such as PuTTY, set the following:
Serial Line to connect to: <Enter COM>
Speed: 115200
Data Bits: 8
Stop Bits: 1
Parity: None
Flow Control: None
Connect the serial cable to the USB port of the switch and log into the switch as administrator.
The system responds with:
Welcome to Cornelis Networks CN5000 <Switch> Series CLI.
Type 'list' for the list of commands.
where <Switch> denotes the CN5000 Switch or DCS.
Disable DHCP.
admin@CNEdge -> network dhcp --disable
DHCP will be disabled. Continue? (yes/no) yes
DHCP:
IPv4: disabled
IPv6: enabled
Enter the switch IP address type.
Using a subnet prefix:
admin@CNEdge -> network ip <ip_address>/<subnet_prefix>
IP: <ip_address>/<subnet_prefix> (Source: Static)
Netmask: <net_mask>
Or, using a net mask:
admin@CNEdge -> network ip <ip_address> <net_mask>
IP: <ip_address>/<subnet_prefix> (Source: Static)
Netmask: <net_mask>
Deleted address: <old_ip_address>
where
<ip_address>is the new IP address in dotted decimal format (that is,xxx.xxx.xxx.xxx),<subnet_prefix>is the subnet prefix (/XX), and<netMask>is the new subnet mask in dotted decimal format.Enter the switch gateway IP address type.
admin@CNEdge -> network gateway <ip_address>
Default Gateway:
IPv4: <ip_address>
IPv6: not set
where
<ip_address>is the new gateway IP address in dotted decimal format. The changes are effective immediately.Connect to the switch using the new IP address, as the connection with the original IP address will be lost.
3.3.4.2.2. Updating the Management Module IP Addresses
Each management module (MM) of the DCS must have a unique IP address that is different than the chassis IP address of the switch. A redundantly-managed switch will have multiple, unique IP addresses.
The default IP addresses are:
Chassis: 192.168.100.9
Management Module(s): 192.168.100.10
It is necessary for each MM to have a unique IP address for the following reasons:
Unique IP addresses are used when sending syslog messages from a management module to a syslog server.
Provides the ability to ping each management module separately.
If the IP addresses are not unique, collisions occur, causing IP operations to fail.
Note
All management modules are individually tested and configured with the default IP address of 192.168.100.10. In order to avoid an address conflict, be certain to change the default IP address of each MM after inserting it into the chassis.
Note
Make sure when updating the MM IP, only 1 module is inserted into the chassis at a time. Repeat this procedure for the second MM.
To update the IP address on an MM, do the following:
Insert an MM into the chassis.
Connect the MM through the USB port to a serial console software (for example, Putty or Teraterm).
Apply, or reset, power to the MM.
When the system displays
image1orimage2, press the SPACEBAR to interrupt the autoload sequence before the counter expires (within 5 seconds).Enter
moduleip <ipaddress>in dotted decimal format and press ENTER.To update the module netmask address enter
netmask <address>in hexadecimal format and press ENTER.To update the module gateway address enter
gateway <address>in dotted decimal format and press ENTER.At the boot prompt, reboot the MM.
3.3.4.3. Configuring the Remote Syslog Server for the Switch
To avoid losing log information in the event of a hardware failure, Cornelis recommends that you configure a remote syslog server.
Note
To centralize logging for all switches in a fabric, you can configure each switch to point to the same syslog server, which has the syslog daemon (syslogd) running.
Add or un-comment the following two lines from
/etc/rsyslog.confto provide UDP syslog reception:$ModLoad imudp $UDPServerRun 514
In the
/etc/rsyslog.conffile, add one of the following templates as the first rule:If you are using DNS and your switches have hostnames, use the following template to generate the log filenames dynamically.
$template NameBasedLog, "/var/log/chassis/%HOSTNAME%.log"
if $fromhost-ip == '<DNS_PREFIX>' then ?NameBasedLog
where
<DNS_PREFIX>is replaced with the name that is common across all of your switches.For example, if the DNS name for the switches is prefixed with
COR, then the rule reads:$template NameBasedLog, "/var/log/chassis/%HOSTNAME%.log" if $fromhost-ip == 'Cor' then ?NameBasedLog
and a log file for
Cor-01will be named/var/log/chassis/Cor-01.logIf you are not using DNS, use the following template to create rules using the IP address(es) of the switch.
For example:
$template ChassisBasedLogSTF2M201, "/var/log/chassis/%HOSTNAME%_STF2_M201.log"
$template ChassisBasedLogSTF2M202, "/var/log/chassis/%HOSTNAME%_STF2_M202.log"
$template ChassisBasedLogSTF2, "/var/log/chassis/%HOSTNAME%_STF2.log"
if $fromhost-ip == '<ipaddress>' then ?ChassisBasedLogSTF2M201
if $fromhost-ip == '<ipaddress>' then ?ChassisBasedLogSTF2M202
if $fromhost-ip == '<ipaddress>' then ?ChassisBasedLogSTF2

$template ChassisBasedLogEDF1, "/var/log/chassis/%HOSTNAME%_EDF1.log"
if $fromhost-ip == '<ipaddress>' then ?ChassisBasedLogEDF1
Save the file and restart the daemon:
systemctl restart rsyslog
Initiate an SSH session to the CN5000 Switch or the Primary Management Module (MM) on a Director Class Switch (DCS) and run the following command, substituting
<linux-host-ipaddr>with the IP address of the Linux host with the modified/etc/rsyslog.conf.logsyslogconfig -h <linux-host-ipaddr>For example:
logsyslogconfig -h <ipaddress>
Test the configuration by generating a test log from the switch:
logSyslogTest –e
Note
On the DCS, in addition to running the above command on the Primary, initiate an SSH session to the Standby and exit the session.
Two logs will be generated by the Standby MM, one upon SSH session start and one upon session end.
Ensure that the test log(s) generated in the previous step are present in the appropriate
/var/log/chassis/<log-file>files.Note
On older Linux versions, the file may be called
/etc/syslog.confand you might need to include the following additional line in the file:SYSLOGD_OPTIONS="-r"
Additionally, the restart command might be:
systemctl restart syslogd